
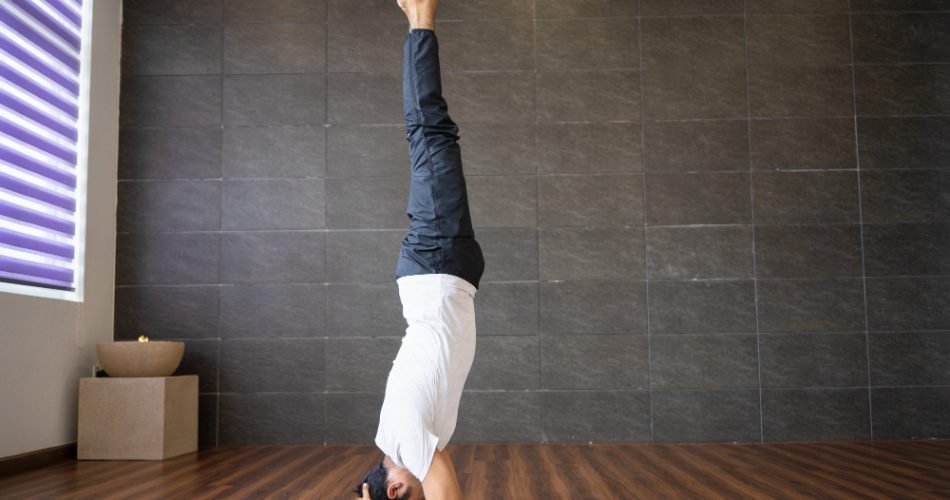
Shirshasana : An asana in which you balance on your elbows, arms, and head.
Shirshasana otherwise called the Headstand, is a high level yoga represent that is both empowering and quieting. It is an extraordinary method for expanding energy and concentration, while likewise giving a feeling of equilibrium and harmony.
The actual posture is very straightforward. To start, you should come into a bowing situation on the floor. Put your lower arms on the ground and intertwine your fingers. Ensure your elbows are shoulder-width separated and your lower arms are opposite to the ground. Then, gradually lift your legs off the ground and bring your knees towards your chest. When your knees are away from plain view, gradually bring your feet up towards the roof.
When your feet are off the ground, press your toes into the ground and gradually fix your legs. Keep your center drew in and your spine straight as you gradually walk your feet up the wall. Ensure your weight is equally dispersed between your lower arms and your head. Hold the posture however long you are agreeable and afterward leisurely return.
The advantages of Shirshasana are various. It assists with fortifying the center, further develop equilibrium, and increment center. It can likewise assist with decreasing pressure and nervousness, further develop dissemination, and even diminish cerebral pains. Furthermore, it can assist with further developing stance and help with assimilation.
Generally, Shirshasana is an extraordinary posture to rehearse in the event that you are hoping to build energy, concentration, and equilibrium. It is a high level posture, so try to rehearse it with alert and to gradually consistently emerge from the posture.
The most effective method to Plan for Shirshasana: Tips for Fledglings
Getting ready for Shirshasana, or headstand, can be scary for novices. All things considered, a posture expects you to adjust your whole body on your head! Yet, with a couple of tips and a touch of training, you can figure out how to dominate this posture.
The initial step to planning for Shirshasana is to ensure you have the right props. You’ll require a mat, a wall, and a block or two. The wall will give soundness, the mat will pad your head, and the blocks will assist you with tracking down the right arrangement.
When you have your props, you’ll need to heat up your body. Begin with some delicate stretches to relax your muscles and increment your adaptability. This will assist you with moving all the more effectively into the posture.
Then, practice the means that will assist you with getting into Shirshasana. Begin by bowing on your mat and entwining your fingers behind your head. Then, at that point, put your head on the mat and walk your feet in towards your head. From here, you can gradually lift your advantages, utilizing your center muscles to keep your equilibrium.

At long last, take as much time as is needed and practice. Shirshasana is a difficult posture, so cheer up in the event that you don’t move it immediately. With persistence and practice, you’ll have the option to dominate this posture.
How to Do Sirsasana Step by Step
Shirshasana the king of all asanas and the reasons are not hard to find. B.K.S. Iyengar
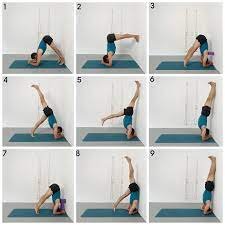
Stage 1 – Characterize the Space
Incline advances, fastening each hand around the contrary elbow and spot your arms around 8 inches away from your knees on the floor before you. Keep the backside on the heels.
Stage 2 – Structure a Triangle Base
Keeping your elbows where they are, push your hands ahead and interlock your fingers. This makes a firm three-sided base with your hands and elbows, with equivalent load on every one of the three marks of the triangle. Intellectually attest “my arms are my legs”.
Stage 3 – Make a beeline for Floor
Twist around and place the highest piece of your head on the floor, immovably squeezing the mount of elbows and hands against the mat and with your hands solidly supporting the rear of your head. Try not to move the elbows. Keep the neck straight.
Stage 4 – Fix Knees and Lift the Hips
Without moving the head or elbows, fix the knees and lift the hips. The weight is kept on the elbows. Ensure that the elbows are fixed.
Stage 5 – Walk the Feet Forward
Walk the feet forward, attempting to keep the knees straight. As the feet draw nearer to the head, feel the back fixing. Continue to stroll until the hips are straight over the head. Continue squeezing the load on the supporting mount you have made with your arms.
Stage 6 – Knees to Chest
Cautiously lift the feet off the ground, bowing the knees to the chest. This requires utilizing the stomach and lumbar muscles. Bring the feet up to the hindquarters and attempt to stand firm on this situation. Fix the back. Try not to attempt to ‘bounce’ or ‘kick up’ and don’t attempt to fix your legs as you could without much of a stretch lose balance doing this and fall straight on your back. All things considered, gradually slant your pelvis in reverse until you track down the place of equilibrium in your lower back. Here, the heaviness of your bowed legs is adjusted by the heaviness of your hips and rear end. Keep however much help as could be expected on your lower arms and hands. Inhale musically and hold this half headstand for as long as one moment.
Stage 7 – Fix the Hips
Keeping the knees bowed and together, gradually fix the hips until the twisted knees are pointing towards the roof. Feel like the hips are a pivot that is gradually opening. Try not to be in a rush. Keep the focus on the elbows and ensure they don’t take off the ground. Likewise center around the equilibrium in your lower back, so your body neither overturns advances nor in reverse.
Stage 8 – Fix the Knees
Gradually fix the knees, bringing the feet up. Make sure to keep the load on the elbows and inhale profoundly. Begin with 5 seconds, slowly expanding the opportunity to fifteen minutes. Ideal time is five to ten minutes consistently. While in the headstand make the breath smooth and rhythmical. The weight stays on the elbows.
Coming Down
Gently leave this asana as carefully as you entered it.
•Twist your knees and lower them.
•Fix your legs. Carry your feet to the ground, and afterward bring down your knees.
•Bring down your body with the goal that your hindquarters lay behind you as in the Kid’s Posture.
•At long last, loosen up your hands and return to the full Youngster’s Posture.
•Try not to lift your head upright away. Rest for basically a moment.
•Loosen up in the Carcass Posture prior to proceeding.
Benefits of Shirshasana for Mental and Physical Health
The Shirshasana, or headstand, is an incredibly beneficial yoga pose for both mental and physical health. As an inversion, it reverses the effects of gravity on the body, providing a refreshing and rejuvenating experience.
Physically, the Shirshasana increases blood flow to the brain, improving concentration and memory. It also strengthens the arms, shoulders, and spine, as well as improving posture. Additionally, it helps to improve digestion and circulation, and can even help to reduce stress.
Mentally, the Shirshasana helps to calm the mind and reduce stress. It can also help to improve focus and clarity, and can even be used as a form of meditation. It can also help to reduce anxiety and depression, and can even help to improve self-confidence.
Overall, the Shirshasana is an incredibly beneficial pose for both mental and physical health. It can help to improve concentration, posture, digestion, circulation, and even reduce stress. It can also help to improve focus, clarity, and self-confidence. If you are looking for a way to improve your mental and physical health, the Sirsasana is a great place to start.


 2023
2023  by us | All Rights Reserved