
Introduction
Sarvangasana, also known as Shoulderstand, is a popular yoga pose that offers a range of physical and mental benefits. This pose has been practiced for centuries and is known for its ability to improve circulation, stimulate the thyroid gland, and calm the mind. Shoulderstand is an intermediate pose that requires strength, balance, and flexibility. If you’re new to yoga, don’t worry – with the right technique and guidance, you’ll be able to master this pose in no time. In this step-by-step guide, we’ll break down the elements of Shoulderstand and show you how to practice it safely and effectively. By the end of this post, you’ll have a better understanding of how to perform Sarvangasana and how it can improve your overall health and well-being.
1. Introduction to the Shoulder stand pose
The Shoulderstand pose, known as Sarvangasana in Sanskrit, is one of the most popular yoga poses due to its many benefits for the body and mind. This pose is a part of the Hatha Yoga tradition and is often practiced at the end of a yoga session as a way to cool down and relax the body.
The Shoulderstand pose is believed to improve thyroid function, boost metabolism, and increase circulation throughout the body. The pose is also known to alleviate stress, anxiety, and fatigue, and improve overall mental health.
To practice the Shoulder stand pose, you’ll need a yoga mat and a comfortable space where you can lie down on your back. The pose can be challenging for beginners, so it’s important to take your time and work your way up gradually as you build strength and flexibility in your upper body and core.
In this step-by-step guide, we’ll take you through the Shoulderstand pose, breaking down each step and providing helpful tips to ensure you get the most out of this beneficial yoga pose. So, get your mat ready, and let’s dive in!
2. Benefits of practicing the Shoulderstand pose
The Shoulderstand pose, also known as Sarvangasana, is a powerful inversion that offers numerous physical and mental benefits. As the name suggests, the pose involves balancing the weight of your body on your shoulders, neck, and head. This puts pressure on your thyroid gland, which is responsible for regulating your metabolism and hormone production. As a result, practicing the Shoulder stand pose can help to balance your hormones and boost your energy levels.
Another benefit of the Shoulder stand pose is that it can improve your digestion. Inversions are known to stimulate the digestive system and increase blood flow to the abdominal area, which can help to alleviate constipation and other digestive issues. Additionally, the pose can help to reduce stress and anxiety by calming the nervous system and promoting relaxation.
The Shoulderstand pose is also great for strengthening your upper body, particularly your shoulders, neck, and core muscles. By holding your body weight in this position, you’ll build strength and endurance in these key areas. And because the pose requires you to hold your breath and focus your mind, it can also improve your lung capacity and concentration skills.
Overall, the Shoulderstand pose is a challenging but rewarding posture that offers a wide range of physical and mental benefits. By incorporating it into your yoga practice, you can improve your overall health and wellbeing.
3. Preparing the body for the Shoulderstand pose
Before attempting the Shoulderstand pose, it is important to prepare the body to avoid any risk of injury. The Shoulderstand pose is considered an advanced yoga pose, which requires a lot of strength and flexibility from the neck, shoulders, and upper back muscles. Here are some pre-pose exercises that will help prepare your body for the Shoulderstand pose:
1. Warm-up: Start with some gentle warm-up exercises, such as Sun Salutations or Cat-Cow to increase blood flow and warm up the body.
2. Neck and shoulder stretches: Practice neck and shoulder stretches to release any tension in those areas. This will help to avoid any discomfort during the Shoulderstand pose.
3. Bridge pose: Practice Bridge pose to strengthen your upper back muscles and stretch your spine. This pose will prepare your body for the Shoulderstand pose.
4. Plow pose: Plow pose is a great preparatory pose for the Shoulderstand pose. It helps to stretch the entire back of the body, including the neck, shoulders, and upper back muscles.
By incorporating these pre-pose exercises into your yoga practice, you will be able to prepare your body for the Shoulderstand pose and avoid any risk of injury. Remember to always listen to your body and never force any pose beyond your limits. With practice and patience, you will be able to master the Shoulderstand pose and enjoy its many benefits.
4. Step-by-Step guide to Sarvangasana
Sarvangasana, also known as the Shoulderstand, is one of the most popular yoga asanas. This pose has a plethora of benefits, including stimulating the thyroid gland, promoting blood circulation, and improving digestion. It is a relatively easy pose to perform, but it’s important to practice it correctly to avoid any strain or injury.
Here is a step-by-step guide to performing Sarvangasana:
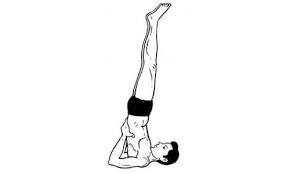
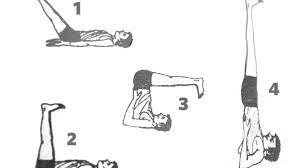
1. Lie down flat on your back with your arms by your side and palms facing down.
2. Slowly lift your legs up towards the ceiling, making sure to keep them straight.
3. Place your hands on your lower back for support and lift your hips and lower back off the ground.
4. Use your hands to support your back and lift your legs up towards the sky.
5. Keep your elbows close to your sides and try to keep your body in a straight line.
6. Hold this pose for 30 seconds to 1 minute, breathing deeply and relaxing your body.
7. To come out of the pose, slowly lower your legs back down to the ground and release your hands from your back.
Remember to listen to your body and not push yourself too far. If you are a beginner, it’s best to practice under the guidance of a qualified yoga instructor. With regular practice, you will be able to master Sarvangasana and enjoy its numerous benefits.
5. Common mistakes to avoid while practicing the Shoulderstand pose
While practicing the Shoulderstand pose, it is important to be mindful of certain common mistakes that can lead to injuries or discomfort. Here are a few things to keep in mind:
1. Avoid placing too much pressure on your neck: This is a common mistake and can lead to neck strain or injury. Always ensure that your shoulders and upper back are supporting the weight of your body, and not your neck.
2. Don’t lift your legs too high: While it may be tempting to lift your legs as high as possible, it’s important to keep them at a comfortable angle. Avoid overextending your legs, as this can strain your lower back.
3. Don’t hold your breath: It’s common to hold your breath while holding a pose, but this can lead to tension and discomfort. Remember to breathe deeply and evenly throughout the pose.
4. Don’t rush the pose: The Shoulderstand is a challenging pose and requires patience and practice. Don’t rush through the pose or force your body into positions that feel uncomfortable.
By avoiding these common mistakes and being mindful of your body and breath, you can safely and effectively practice the Shoulderstand pose and experience the many benefits it has to offer.
6. Modifications to the Shoulderstand pose for beginners
If you are new to Sarvangasana or the Shoulderstand pose, it is important to start with modifications to avoid injury and gradually work your way up to the full pose. Here are some modifications that you can try:
1. Use props: Place a folded blanket under your shoulders and neck for support. This will also help to lift your shoulders off the ground, allowing you to get into the pose with ease.
2. Use the wall: Stand with your back against a wall and place your feet up the wall as you lift your hips up into the shoulderstand. This modification will help you to feel more stable and give you the confidence to hold the pose for longer.
3. Use a chair: Sit on a chair with your back to the wall and place your feet up the wall as you lift your hips up into the shoulderstand. This modification will give you the support you need to get into the pose and hold it for a longer period of time.
Remember, it is important to listen to your body and only do what feels comfortable for you. As you continue to practice, you will gradually build strength and flexibility and be able to move into the full pose. With consistent practice, you will soon be able to master the Shoulderstand pose and enjoy its many benefits.
7. How to deepen the Shoulderstand pose for advanced yoga practitioners
Once you have mastered the basic Shoulderstand pose, you can deepen it to make it more challenging and beneficial. These advanced variations should only be attempted by experienced yoga practitioners.
One way to deepen the Shoulderstand pose is to bring your hands to your back and interlace your fingers behind you. This will help you lift your chest higher and stretch your shoulders and triceps. Be sure to keep your elbows shoulder-width apart and your forearms parallel to each other.
Another variation is to bring your legs into a Lotus pose, where you cross your legs and place each foot on the opposite thigh. This will increase the stretch in your hips and thighs, and also challenge your balance. If you are not able to do Lotus pose, you can try a Half-Lotus or simply cross your legs at the ankles.
For an even greater challenge, you can try lowering your legs behind your head into a Plow pose, and then slowly lifting them back up into Shoulderstand. This will improve your spinal flexibility and strengthen your core muscles.
Remember to always listen to your body and not push yourself beyond your limits. With consistent practice, these advanced variations of the Shoulderstand pose can help you deepen your yoga practice and reap even more benefits for your mind and body.

8. Alternatives to the Shoulderstand pose for those with neck or shoulder injuries
While the Shoulderstand pose, or Sarvangasana, offers many benefits to the body, it is not suitable for everyone. Those with neck or shoulder injuries should avoid this pose to prevent further harm to these areas. However, there are alternative poses that can be practiced to achieve similar benefits without putting pressure on the neck and shoulders.
One alternative is the Legs-Up-the-Wall pose, or Viparita Karani. This pose involves lying on your back with your legs extended up against a wall. This inversion pose helps to reduce stress and anxiety, improve circulation, and relieve tension in the legs and lower back.
Another alternative is the Bridge pose, or Setu Bandha Sarvangasana. This pose involves lying on your back with your knees bent and feet flat on the ground. You then lift your hips up towards the ceiling, engaging your glutes and core muscles. This pose helps to strengthen the back and legs, improve digestion, and reduce fatigue.
It’s important to listen to your body and avoid any poses that cause pain or discomfort. If you have any concerns or injuries, consult with a certified yoga instructor or healthcare professional before attempting any new poses. By practicing alternative poses, you can still reap the benefits of yoga without risking further harm to your neck and shoulders.
9. Frequently asked questions about the Shoulderstand pose
As with any yoga pose, the Shoulderstand pose, also known as Sarvangasana, may raise some questions for beginners or even advanced practitioners. Here are some frequently asked questions about the Shoulderstand pose:
1. What are the benefits of the Shoulderstand pose?
The Shoulderstand pose has many benefits, including improving digestion, calming the mind, and reducing stress and anxiety. It also stimulates the thyroid gland, which can help regulate metabolism.
2. Can anyone do the Shoulderstand pose?
While the Shoulderstand pose is generally safe for most people, it may not be suitable for those with neck injuries or other medical conditions. It’s always important to consult with your doctor before trying any new exercise or pose.
3. How do I properly align my body in the Shoulderstand pose?
To properly align your body in the Shoulderstand pose, start by laying on your back with your arms by your sides. Lift your legs up, and use your hands to support your lower back. Slowly lift your hips off the ground, bringing your legs up and over your head. Keep your shoulders and head on the ground, and press your elbows into the floor to support your body.
4. How long should I hold the Shoulderstand pose?
It’s recommended to hold the Shoulderstand pose for 30 seconds to 1 minute, gradually increasing the time as you become more comfortable with the pose.
5. Can I modify the Shoulderstand pose if I have tight shoulders or neck?
If you have tight shoulders or neck, you can modify the Shoulderstand pose by placing a folded blanket or yoga block under your shoulders for support. This will help alleviate any discomfort in the neck or shoulders.
Remember to always listen to your body and never force yourself into a pose that doesn’t feel comfortable. With practice and patience, you can master the Shoulder stand pose and reap its many benefits.
10. Tips for practicing the Shoulderstand pose safely and mindfully
While mastering the shoulderstand pose can be a great achievement, it is essential to prioritize safety and mindfulness throughout your practice. Here are some tips to help you practice the Shoulderstand pose safely and mindfully:
1. Start slow and steady: It is important to start slowly, especially if you are a beginner. Ease into the pose gradually, and only go as far as your body allows.
2. Use props: Props such as blankets or blocks can help you to achieve the correct alignment and provide support for your neck and shoulders.
3. Engage your core: Keep your core engaged throughout the pose to support your spine and prevent injury.
4. Keep your neck protected: Be mindful of your neck alignment and avoid putting too much pressure on it. If it feels uncomfortable, you can use a folded blanket or towel under your shoulders to support your neck.
5. Breathe deeply: Focus on your breath throughout the pose, taking slow and steady breaths through your nose. This will help you to stay calm and centered.
6. Listen to your body: Always listen to your body and honor its limitations. If you feel any pain or discomfort, slowly come out of the pose and take a break.
By practicing the Shoulderstand pose safely and mindfully, you can enjoy the many benefits of this powerful yoga pose while avoiding injury and discomfort.


 2023
2023  by us | All Rights Reserved